A Cheap Sailboat Autopilot WiFi Remote Using ESP32
A few days ago I came across a yt video discussing the ESA Copernicus program, a European initiative for monitoring earth via a satellite constellation. This constellation is composed of numerous satellites called Sentinels, which scan the Earth daily for different parameters. What astonished mew as the fact that all the produced data is open to public and updated every day, so anyone can download and utilize it.
So, on a rather dull Monday, I embarked on: to create something using this data. Given my fondness for ships, I decided to create something ship-related, a software to download and recognize ships using machine learning.
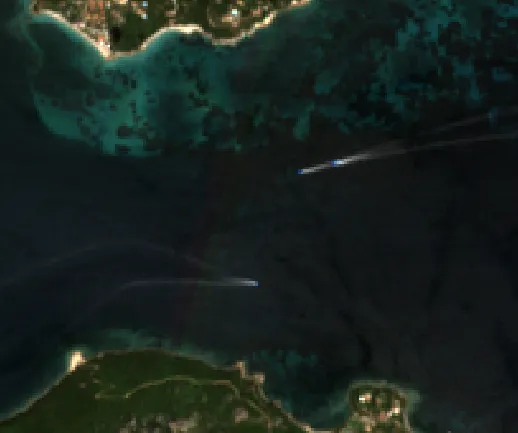
Since Sentinel-2 images have thebest resolution of 1 pixel x 10 meters, I chose to detect only moving ships because their wakes are easier to spot and less likely to result in a false positive.
Furthermore, wakes provide additional information, such as the vessel’s direction and its approximated speed.
The first thing to do is to programmatically download the data. I chose Sentinel-2 satellites as my data source, which cover the whole Earth every five days and offer ready-to-use True Color Image (TCI) in jp2 format (jpeg 2000).
Downloading data from Copernicus is straightforward. Just signup at https://scihub.copernicus.eu, select the area, and download. Using the code is easy as well, as can be seen in the following snippet.
import fnmatch
from sentinelsat import SentinelAPI, make_path_filter

sapi = SentinelAPI(SUSER, SPASSWORD, 'https://scihub.copernicus.eu/dhus/')

# Query scihub for Sentinel2 data from the last 24h
p = sapi.query(date=('NOW-1DAYS', 'NOW'), area_relation="Intersects", platformname='Sentinel-2',
     processinglevel='Level-2A')

# Create a pathfilter for downloading only TCI at 10m resolution
def path_filter(a):
 npath = a['node_path']
 return fnmatch.fnmatch(npath, '*_TCI_10m.jp2')

# Download only if the cloud coverage is less than 30%
for key, value in p.items():
 cov = value['cloudcoverpercentage']
 if cov > 30.:
  print ('skipping for cloud coverage', size, cov)
  continue
 sapi.download(key, './tempdataset', nodefilter=path_filter)
Once you run it, you’ll have jp2 images from Sentinel-2 from the last day.
For this step, I used QGIS which supports JP2 rasters. First, open the jp2 file, create a polygon shapefile layer, switch to edit mode and press “Add a Polygon”. Now we have to select the boundary of a ship (including the wake); finding them is easier than you might think.
After doing this to a good number of ships, export the layer as a GeoJSON. Repeat the process with at least other file, which will be used for validating the training on new data.
Now that we have a substantial amount of training data, we can start to create and train our model. Luckily for us, there’s a fantastic open-source library and framework called RasterVision which offers a powerful tool for semantic segmentation and object detection on raster data.
For my proof of concept, I used it as a framework as follows: I defined two scenes, one for training and the other for validating the results. Then, I created all the configurations for the training, returning an ObjectDetectionConfig object.
from os.path import join, dirname

from rastervision.core.rv_pipeline import (ObjectDetectionConfig,
                                           ObjectDetectionChipOptions,
                                           ObjectDetectionPredictOptions)
from rastervision.core.data import (
    ClassConfig, ObjectDetectionLabelSourceConfig, GeoJSONVectorSourceConfig,
    RasterioSourceConfig, SceneConfig, DatasetConfig, ClassInferenceTransformerConfig)
from rastervision.pytorch_backend import PyTorchObjectDetectionConfig
from rastervision.pytorch_learner import (
    Backbone, SolverConfig, ObjectDetectionModelConfig,
    ObjectDetectionImageDataConfig, ObjectDetectionGeoDataConfig,
    ObjectDetectionGeoDataWindowConfig, GeoDataWindowMethod)

import os


def get_config(runner, data_uri='./dataset', full_train=True, nochip=False):
    def get_path(part):
        return join(data_uri, part)

    class_config = ClassConfig(
        names=['ship'], colors=['red'])

    def make_scene(scene_id, img_path, label_path):
        raster_source = RasterioSourceConfig(
            channel_order=[0, 1, 2], uris=[img_path])
        label_source = ObjectDetectionLabelSourceConfig(
            vector_source=GeoJSONVectorSourceConfig(
                uri=label_path,
                ignore_crs_field=True,
                transformers=[
                    ClassInferenceTransformerConfig(default_class_id=0)
                ])
        )
        return SceneConfig(
            id=scene_id,
            raster_source=raster_source,
            label_source=label_source)

    chip_sz = 300
    img_sz = chip_sz

    scenes = [
        make_scene('od_test', get_path('t1.jp2'),
                   get_path('t1.geojson')),
        make_scene('od_test-2', get_path('t2.jp2'),
                   get_path('t2.geojson'))

    ]
    scene_dataset = DatasetConfig(
        class_config=class_config,
        train_scenes=scenes[0:1],
        validation_scenes=scenes[1:])

    chip_options = ObjectDetectionChipOptions(neg_ratio=1.0, ioa_thresh=1.0)

    if nochip:
        window_opts = ObjectDetectionGeoDataWindowConfig(
            method=GeoDataWindowMethod.sliding,
            stride=chip_sz,
            size=chip_sz,
            neg_ratio=chip_options.neg_ratio,
            ioa_thresh=chip_options.ioa_thresh)

        data = ObjectDetectionGeoDataConfig(
            scene_dataset=scene_dataset,
            window_opts=window_opts,
            img_sz=img_sz,
            augmentors=[])
    else:
        data = ObjectDetectionImageDataConfig(img_sz=img_sz, augmentors=[])

    model = ObjectDetectionModelConfig(backbone=Backbone.resnet18)
    solver = SolverConfig(
            lr=1e-4,
            num_epochs=12,
            batch_sz=8,
            one_cycle=True,
            sync_interval=300)
    backend = PyTorchObjectDetectionConfig(
        data=data,
        model=model,
        solver=solver,
        log_tensorboard=True,
        run_tensorboard=True)

    predict_options = ObjectDetectionPredictOptions(
        merge_thresh=0.1, score_thresh=0.5)

    return ObjectDetectionConfig(
        root_uri='.',
        dataset=scene_dataset,
        backend=backend,
        train_chip_sz=chip_sz,
        predict_chip_sz=chip_sz,
        chip_options=chip_options,
        predict_options=predict_options)
And finally I run it with:
rastervision run sentiship.py
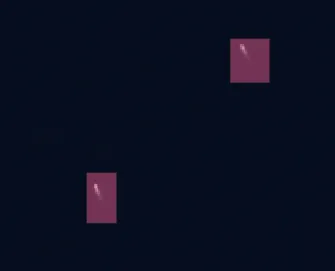
After 12 epochs of training, it was already able to detect ships — easy peasy!
Moving forward, I am keen to explore how to put this model to further use. One intriguing possibility that springs to mind is to employ it for detecting ‘ghost ships’ — vessels that don’t have an Automatic Identification System (AIS). These elusive ships, often engaged in illicit activities or abandoned, pose significant challenges for maritime authorities. By harnessing the power of machine learning and the vast amount of data provided by the Copernicus program, we may be able to shed more light on these maritime mysteries. Stay tuned for more updates as I delve deeper into this exciting venture!
Github repo: https://github.com/dakk/sentiship
Article on medium.
During my Quantum Computing journey, I often needed to simulate some quantum circuits; sometimes they are small, but some other times they are bigger enough ...
Despite it is sold as a non-cartographic handled GPS device, with limited storage capacity of 10 MB and the inability to expand it, the eTrex 10 GPS, like al...
Since the latest v0.1.18 version, the Qlasskit library offers two useful tool for circuit analysis and optimization.
In the last release of Qlasskit, I introduced a new feature able to export a qlassf function to a binary quadratic model (as bqm, qubo or ising model). This...
In early 2023, I embarked on a journey to explore the field of probabilistic computing. This endeavor culminated in the construction of a hardware prototype,...
Today, I’m going to show you how to use Qlasskit to create a quantum circuit able to search for Sudoku puzzle solutions.
In a recent article I wrote, “Quantum Computing on a Commodore 64 in 200 Lines of BASIC”, published both on Medium and Hackaday.com, shows a two-qubit quantu...
Traditionally, creating quantum circuits requires specialized knowledge in quantum programming. This requirement holds true when encoding a classical algorit...
In an age where companies are selling two-qubit quantum computers for a sum of money that would make your wallet recoil in horror, here we are, stepping off ...
This June I emerged as one of the top participants with 9 bounties collected (alongside another exceptional contributor) in the #UnitaryHack Hackathon, hoste...
A few days ago I came across a yt video discussing the ESA Copernicus program, a European initiative for monitoring earth via a satellite constellation. This...
Qiskit is a python SDK developed by IBM and allows everyone to create quantum circuits, simulate them locally and also run the quantum circuit on a real quan...
As someone noticed from the previous post, last weeks I started to write a new programming language for Tezos smart contracts. This project was initially int...
While writing a new programming language, it is often useful to write some real use-cases to test the syntax, the language expressiveness and the code cleann...
Documentation is like sex: when it is good, it is very, very good; and when it is bad, it is better than nothing
This is my new blog, based on jekyll. I’ll soon import old posts from my old blog.
Contractvm is a general-purpose decentralized framework based on blockchain. The framework allows to implement arbitrary decentralized applications in an eas...
Most of bitcoin dice software use a system to prove the fair play of the server for each bet. Most of them implement this mechanism using two seed (server se...
In the aim to merge two of my server on digitalocean, today I tried to write a mod_rewrite rule to redirect a secondary domain to a subfolder. After one hour...
MineML is a multithread CPU based bitcoin miner written in F#. At the moment it’s a slow implementation, but the class structure offers the possibility to im...